

- Isolation Milling a Custom PC Board
While the finish was curing on my latest guitar project … and while I worked out how to fix some issues with inadvertant overspray … I turned my attention to another interest: electronics.
The kids and I have been playing around lately with Arduino. OK, well mostly me, but I’ve managed to catch the interest of my 10 year old son, with whom I prototyped a rudimentary “guitar tuner” using a nano, piezo, and several push buttons. My 11 year old daughter’s caught the bug as well, or should I say the mouse as we’ve been working on an analog project “Mousey the Junkbot,” though thus far without much success.
In any case, I’ve been itching to try out PCB engraving – or “isolation milling” on the CNC machine. If you’re not familiar, this is basically the process of creating a circuit board from raw copper clad board by removing the negative bits between the traces you want, thereby isolating the lines you need from one another. This may be done on a CNC machine with a very fine engraving bit – many sold specifically for this purpose.
Being a newbie to PCB design and fabrication, I naturally turned to the Internet for advice. I found numerous options and tried several of them. In the end I managed to cut a few good boards, with some headaches and false starts along the way.
Fritzing (http://fritzing.org)
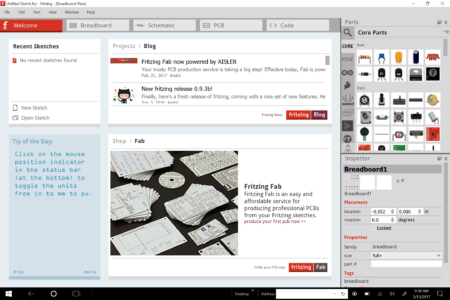
Fritzing main screen
This is one of the first programs I discovered while learning Arduino. It’s free and boasts an attractive UI. My initial design for the circuit used a 2-digit 7-segment display, which wasn’t available in the Fritzing parts inventory. I attempted to create one of my own and found the process frustrating. I also experienced some UI issues with the parts library dissappearing and overall sluggish program response. I was also hoping to find a way to simulate my circuit so I could work on it while I was on vacation or simply commuting between work and home. And so, I kept searching.
Circuits.io (http://circuits.io)
Next I stumbled upon this pretty amazing site by Autodesk. Here you can virtually prototype and simulate your circuit designs. It even allows users to develop Arduino code that executes in the simulated environment. I was able to build my prototype circuit, test out the code and ensure I wasn’t going to blow things up. While this all works well, there are still some issues. First, the site is sloooooooow. I realize it’s doing a lot, but at times it’s completely unusable, especially when I’m mobile. The inventory of available parts is also fairly limited. Considering the fact that every part in the system needs to be coded to work within a simulation, this isn’t surprising. However, I found it odd that there was a common anode 7-segment display, but not a corresponding common cathode version…which is basically the same thing but in reverse. This was very inconvenient as I had common cathode displays on hand and wasn’t about to purchase a replacement just because it wasn’t simulatable within circuits.io. I wound up designing and testing the circuit on the website using the common anode version of the part, and then cloning the project and reconnecting the common pin to ground in order to design the PCB board. I also ran into a few odd bugs – one of which necessitated deleting the project at one point and starting over. My posts to the support site to this day have remained unacknowledged. Sigh.
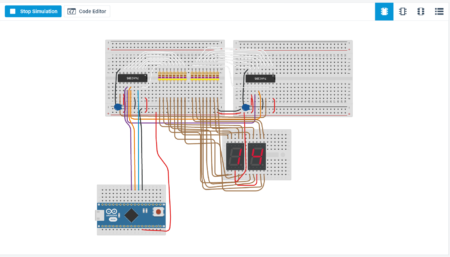
Simulating a 2-digit 7-segment LED circuit
That said, I did manage to design a PCB board, export the Gerber files for it, and upload these to OSH Park. I immediately ordered 3 boards from there for <$20 and, while awaiting these, continued my tool search to see if I could find a tool I could use to mill my own boards.
There is an option on the circuits.io site to “Export Eagle Board,” however it never actually worked for me. No matter which design I used (and I tried some very basic ones), the site gave me an error saying it was unable to connect to the service. Clearly this feature is broken and there doesn’t seem to be any urgency to supporting this site. I searched around instead for a way to convert the downloaded Gerber files into usable CNC gcode. For this I found pcb2gcode and pcb2codeGUI.
My first try looked very pretty but suffered from some incomplete traces. I was also struck by just how tiny it was! Looking at it on screen for a few days I never got the sense of just how tiny these lines were. But once cut into a PCB I required magnifiers to verify the traces. I had set the depth a bit too shallow and hadn’t compensated for variations in thickness/level of the board on the CNC. I tweaked the gcode Z value and tried again. This time the board looked good, but the traces were too narrow in spots and there were incomplete routes. I also wasn’t sure how I could solder these connections. The traces passed so close to the connection points that I didn’t feel I could keep my solder work from shorting some of them out. I tested this out anyway and decided I really did need to make myself some more room.
After several attempts at getting this right using circuits.io and pcb2gcode, I decided I should invest some time reviewing and hopefully learning “Eagle.”
Eagle (https://www.autodesk.com/products/eagle/overview)
Another Autodesk product/acquisition, Eagle is the old dog in EDA (Electronic Design Automation) software. It was developed in the late 80’s and the UI hasn’t apparently seen many changes since. Wherever I looked around for info on circuit design, Eagle kept appearing. Clearly this was one of – if not the – industry-standard EDA tool available today. It took a bit to get a feel for the rather clunkly and clumsy UI, but once I managed to get the hang of it…well, so I still haven’t totally gotten the hang of it, but I am many times better with it now than when I initially picked it up. It really would benefit from a major UI overhaul by Autodesk, though I imagine they’d need to maintain some degree of backward compatibility for those with years – if not decades – of practice with the existing interface.
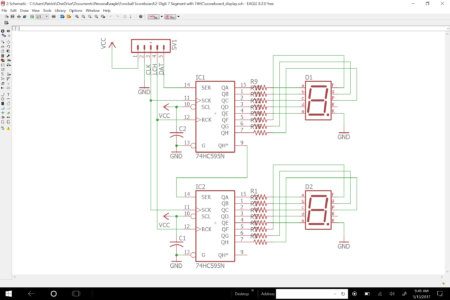
Circuit design for 2-digit display module
I really liked the schematics I was able to produce with this tool. There are also libraries avialable for just about any part you could want. Many of them contributed by users and posted to Github. Most of the “maker” retailers have made their components freely avaialble as Eagle libraries as well. I drew up the schematic based on the simluation circuit from circuits.io (so I knew it would work) and switched to the PCB view.
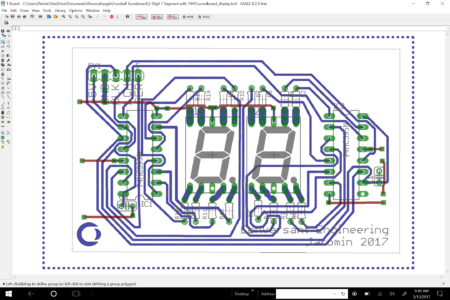
PCB design for 2-digit display
I played a bit with the autorouter, which helped me visualize some routing options. However, in the end I wound up routing nearly all of my own traces. There are some idiocyncrasies with routing that continue to bug me – like how sometimes it wants to snap to odd paths when there’s definitely enough clearance to go the more direct route. I’ve wound up fighting the tool on more than one ocassion. After a few scrapped designs, I was able to create a pretty decent looking board.
PCB-GCode ULP
The next step was to turn this into usable G-code for my CNC. The plugin that kept turning up was “pcb-gcode“. This ULP (user level program) runs within Eagle and provides a GUI that you can work with to produce g-code appropriate for your particular machine. After some toying around, I managed to export some gcode that looked pretty good in the UCCNC software used by my stepcraft CNC machine.
At this point I’m on my 5th or so board and have been getting fairly consistent results with trace widths of 1.27mm and a z-depth of .03mm. It’s still somewhat challenging to solder some of the connections due to the proximity of the traces, but with some patience I’ve been able to get them to work properly.
So far I’ve assembled 4 2-digit boards – 3 using the OSHPark factory boards and 1 with my own shop-milled PCB. I’ve also successfully milled the main controller board and have tested the final assembly with a simple counter program. It works!
https://www.instagram.com/p/BS6nS7pBkH0/
Next up is building the remote scoring units with increment and decrement buttons, as well as an interface for a future automatic goal sensor.