- Designing A New Dresser for Our New Son
- Legs shaped, sides assembled and Ouch!
- Dead Flat
- Face Frame Installed
- Filling in the Blanks
- Gluing up the Carcass
- Circus-themed Baby’s Room
- Drawers
Construction Begins…
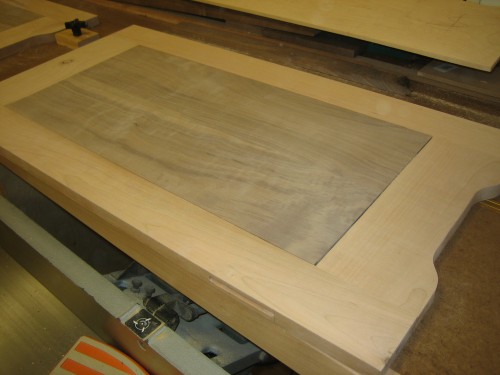
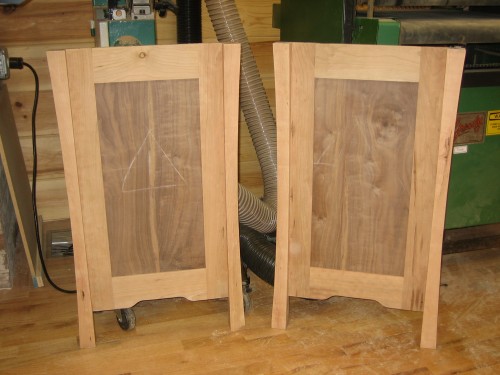
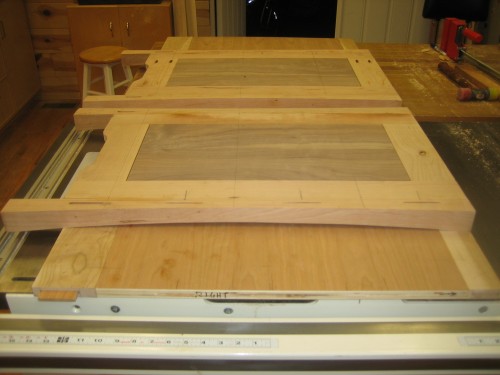
In between trips to the zoo, the Children’s Museum and backyard “play dates” with the kids, I’ve logged some decent shop time on this project the past couple weekends. Last weekend I dimensioned the lumber and assembled the two cherry and walnut frame-and-panel sides. Due to a misaligned rip fence, I wound up with a mortise and stub-tenon joint that simply wouldn’t close. I decided to lop off the tenons and attach the rails to the stiles with splines instead. This worked fine, but resulted in weaker joints than I really need here. I really should have used a larger loose tenon…but more on that later.
In the midst of this work, I picked up a used Grizzly 24″ dual drum sander. I couldn’t resist running these panels through this beast. It made quick work of sanding them perfectly flat…awesome.
Curvy Legs
After cutting the mortises in the leg blanks for the sides and front and back members, it was time to cut the compound curves. This was the part I was really looking forward to! In the past, I would have done this with a template and a flush trim bit. There were two problems I saw with this approach. First off, I’m always anxious about tearout when flushing up cherry. Usually this can be avoided by rough cutting very close to the line — but nonetheless I’ve still occassionally nicked a piece this way. The other issue was a bit more serious – my largest flushing bit has a maximum capacity of 1-1/2″. Since the legs are 1-3/4″ on each side, I’d have to get a longer bit. I’m uncomfortable enough with 1-1/2″ of high-speed exposed spinning carbide. I decided to try Norm’s usual method. About six months ago I picked up the Ridgid oscillating spindle/edge sander. Ya know, the one it seems like everyone has. I really like this tool. I cut to within 1/16″ (sometimes within 1/32″) of the line and then finished the cut off with the edge sander and the standard 80 grit belt. Worked like a charm. I think the results are just beautiful.
Pass the Biscuits, Please…
With the legs cut, it was time to glue up the sides. While these “cooked,” I turned my sights to the back. I had originally planned to use a section of 1/2″ plywood panel capped top and bottom with a 4″ bottom/2-1/2″ top cherry “rail” joined with mortise and loose tenons into the back legs of the side panels. Upon further reflection, I made a very minor modification of my plans and used 3/4″ plywood instead. I did this for two reasons. When thinking through the joinery for the dust panels and final assembly of the carcass, I realized that I needed to first assemble the sides, back and front rail and add the dust panels after this sub-assembly. In the past I’ve designed joinery that required simultaneous glue up of the sides, back and dust frames — and this is simply far too much for one person to juggle. I also didn’t leave room to cut dadoes in the sides for the dust panels and didn’t want to introduce glued on supports either. I decided that the easiest thing to do would be to cut biscuit slots in the sides and back and then cut a continuous slot around the dust frames so that they could simply slide into place in the partially completed carcass. To have enough depth for the #20 biscuits, the back would need to be at least 3/4″ thick. The other reason was simply that the 1/2 ply I had was a low quality birch from HD and I happened to have a 3/4″ sheet of cherry veneer ply left over from a prior job. So this kinda just worked out.
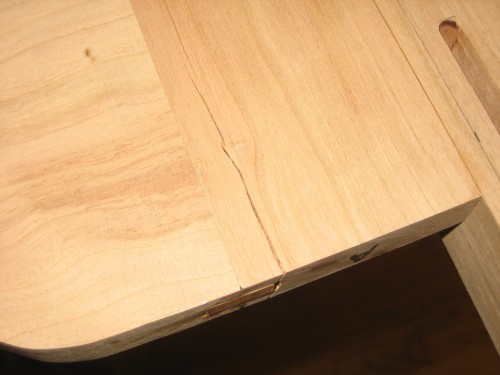
While I was dry assembling one side to the back to mark out for the biscuit slots, the side slipped, did a flip and slammed onto the floor. Unfortunately, the shock split the stiles – one on the top and the other at the bottom – at the point where the spline ended. My “fix” was to install some pocket screws to help hold the split together. The dust panels should provide sufficient additional reinforcement, so I’m not terribly concerned about the longevity of the sides…however I will need to do some work on the outside to obscure the visible checks.
Tomorrow is another day
At this point I’ve got the sides completed, the cherry rails biscuited and glued to the plywood back, and the lines for the biscuit slots to hold the dust frames laid out and ready for the lamello/plate joiner/biscuit cutter/what-have-you to do its thing.
I hope to build the dust frames and assemble the carcass by the end of day tomorrow. I’ll let you know!



One Response to Legs shaped, sides assembled and Ouch!