

- Atomic Age Surfcaster
- Mahogany and Padauk Neck
- Inlaying My New Logo!
- Chain Reaction
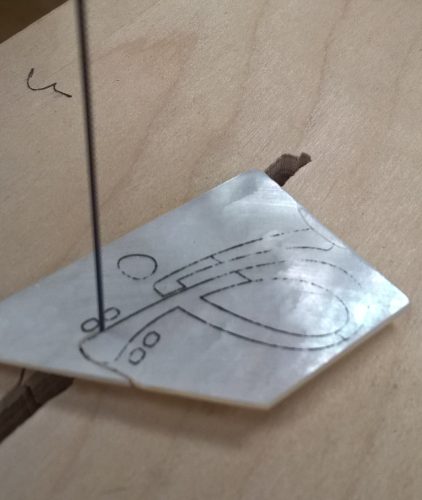
Cutting my new logo from a MoP blank

Logo inlay cavity cut
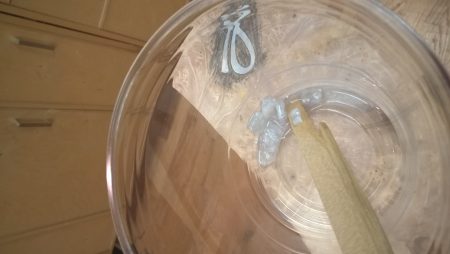
Dissolving plastic pearloid binding in acetone
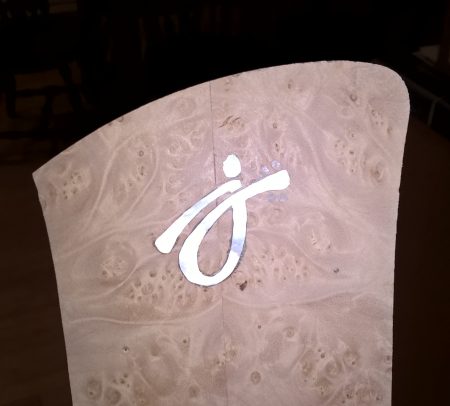
Logo inlaid into headstock

Binding ledge cut

Binding glued on
Now that I’ve a new logo, time to get it inlaid into the headstock.
I again used the “iron on” trick to transfer the laser-printed logo line art to a pearl blank and then cut it out by hand with a jeweler’s saw and fine tooth blade. I then staged the pieces on a bit of double-stick tape. Because the tape is translucent, it was fairly easy to see a printout of the logo through the tape to aid in aligning the pearl. I then exposed the adhesive on the bottom side and affixed the assembly in the desired location on the headstock.
Using a sharp blade, I was able to cut around the logo through the tape and score the Maple headstock. I removed the excess tape and shaded the open areas around the pearl with a pencil. This made the areas to route out very obvious once the pearl pieces were pried from the headstock and the tape residue removed. A small trim router with 1/16″ bit made quick work of evacuating the cavity. A little bit of fussing with the pieces with a small file perfected the fit and the pieces were pushed into place. Thinset CA glue was applied to secure the pearl.
A lesson learned here – Because most of the time I’m inlaying into darker woods, I typically use white chalk to highlight the score lines. In this case, the pencil showed up much better against the light-colored Maple. However I neglected to sand the graphite off before applying the CA glue. This had the effect of washing some of the graphite into the crevice surrounding the pearl, leaving a dark line around the inlay. Thankfully these lines shouldn’t be very noticeable once the headstock is stained, but it is something to avoid in the future.
The small “tuner dots” in the logo were too small for me to cut by hand. I couldn’t manage to hold onto the pieces and lost at least 3 as they fell to the floor and “hid” amongst the sawdust. I decided to instead drill 4 tiny holes and fill them with white plastic pearloid binding dissolved in acetone. The results look acceptably like pearl, though they aren’t nearly as prominent as the rest of the logo. I may wind up purchasing pre-cut pearl side-dot material for the next one. Or dream up some alternative means of cutting these tiny bits!
Speaking of binding, this guitar top will be bound with the same white pearloid plastic as the previous Surfcaster. Binding is pretty simple — route the rabbet ledge and glue it on, using a heat gun to bend the plastic around the tighter curves of the top horns. Again I used StewMac “Bind All” and their orange “binding” tape to finish the job.