

- Atomic Age Surfcaster
- Mahogany and Padauk Neck
- Inlaying My New Logo!
- Chain Reaction

Experimenting with dyed epoxy and brass

The atom routed out
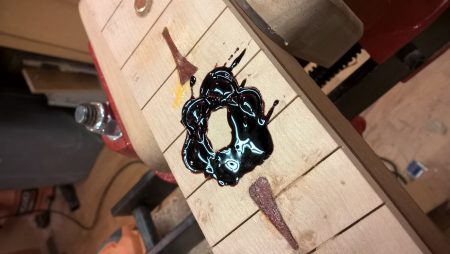
Atom filled with colored epoxy

Atom inlaid with blue abalone

Shop helper applying base coat of red dye stain.

Layering amber on the sanded-back red base

“Nuclear burst” stain complete
As this is the “Atomic Age” Surfcaster, it seems fitting to inlay an atom on the 12th fret. I’m naming the fretboard inlay design “Chain Reaction.” The basic idea is this is the chain reaction leading to the “nuclear burst” finish applied to the body and headstock.
I wanted to do something colorful and beyond typical MoP inlay. So I picked up some brass rod and tube and experimented with dyed epoxy. For the atom, I cut a single oval out of a piece of 1/2″ MDF to use as a router template. The router was outfitted with a 1/16″ bit. I routed around the inside edge of the oval, and then rotated it 120 degrees and repeated the process. Once the basic atom ‘electron orbits’ were routed, I mixed up some 5-minute epoxy with dark brown dye and filled the newly-routed path. After the epoxy cured, the nucleus was cut from abalone and inlaid into the center. For the electrons, I used 1/8″ brass rod inserted into holes in the rings and trimmed flush.
The fret markers were made from brass tube inserted into an appropriately sized hole and then filled with the same epoxy dyed red. For the motion lines between particles, small strips of Padauk were cut and inlaid as well.
While the epoxy cured, I enlisted a couple helpers to work on the “nuclear burst” finish on the body. This is a yellow-orange-red burst finish designed to look a bit like the surface of the sun when applied to the roiling grain pattern of the Maple burl cap.
We started by pre-wetting the top and sanding back the raised grain. Next I mixed up some Transtint bright red dye in water. This was liberally applied by one of my helpers using a soft rag. The red was allowed to soak in a bit and, once dry, sanded back with 220 grit paper. This left red stain only in the more porous sections of the grain.
Next we mixed up some Transtint amber and applied that over the entire top.This was allowed to soak in and dry – but was not sanded back. On top of this we added more red, though this time it was feathered on with none in the middle of the guitar body. The still-wet yellow rag was then used to feather the edges as well and transfer a bit of the red tint closer to the middle.
The result leaves the distinct impression of the chaotic and fiery surface of a star.