

It started innocently enough.
The woman who was doing engraving work on my guitars was suddenly out of business. When I started searching the web for alternatives, I was presented with dozens of results for engraving machines and very few for services. This got me thinking that I could maybe just do it myself — buy a small, inexpensive engraver for simple things like engraving truss rod covers and neck plates. I quickly discovered that the cheap laser engravers wouldn’t handle steel neck plates. So I would need to look at rotary engraving machines.Things quickly escalated from there — I reasoned “if I’m going to buy a CNC machine I’d better get one that could at least cut full-size guitar body templates.”
And so the hunt began.
X-Carve
The first machine I considered was the X-Carve by Inventables. The main reason was one of my favorite YouTube luthiers was selected to receive a free X-Carve in exchange for a video review, and it seemed to be working well for him. However, after watching several of these YT reviews (Inventables sent out a lot of these free machines!) I determined that it simply wasn’t for me. First off, many of the reviewers found them to be imprecise and several had either stopped using them altogether or, in the case of at least one, donated the machine and upgraded to a different brand. It seemed to me like owning an X-Carve was an investment in tinkering with the CNC machine more than building actual components. I don’t really want to become a CNC engineer. Additionally, they weren’t sized well for my shop anyway — the model with a sufficient table size wouldn’t fit comfortably.
CNC Shark
Next I turned to the CNC Shark by Next Wave Automation. For some time I’d been eyeing their small “CNC Pirahna Fx.” At just over $1,500 this seemed like a great deal. Unfortunately I also knew I’d be very quickly frustrated with the small table size — at just over 12″ square there was no way I could cut a guitar body template let alone a body blank. The larger Shark provided sufficient work area, but was also nearly $3,000.
In addition, I was able to take a closer look at these machines at our new local Rockler store and the gantry seemed weak. I could easily deflect the gantry X/Z-axis assembly with only moderate pressure applied at the base of the spindle mount. The Axiom machine sitting next to it was rock solid, but at $4K was above my price limit and again suffered from the same table size issues — the one that fit my space was too small for the work, and the one that fit the work wouldn’t fit in the available space.
3040 and 6040 machines
In the process of researching the name brand machines, I discovered the generic Chinese 3040/6040 machines. No one seems to know who designed and built the originals but there are literally dozens of sellers on Ebay offering some version of this design. Furthermore, the 6040 was sized almost perfectly for my space. It’s a little narrow at just over 15″ of X travel, but would certainly accommodate over 90% of the guitar bodies I’m interested in cutting. Many reviewers report happy experiences with these machiens, but several went through numerous iterations of their setup, replacing various components until they were satisfied with the result.
The price on these machines is incredibly attractive and they seem solidly built and dependable. In the end, however, I was scared away by the owners who reported spending significant time troubleshooting and resolving issues with the machine and controllers. And as for support, while online forums are certainly helpful, when you buy a machine from an unknown manufacturer and seller on EBay, you’re essentially on your own to resolve any issues. The probability of early head-banging and risk of worse just didn’t seem worth the cost savings. I wanted something that would “just work” and included some level of professional support — someone’s phone (or neck!) to ring if there were issues.
The Stepcraft-2 CNC machines
Then I discovered Stepcraft. I was immediately impressed by the aesthetic of the machine — modern, sleek, clean. Furthermore, the 600 model would fit almost exactly in the space I had in mind and the approximately 23.5″ x 16.5″ travel distance means I can cut all but the larger archtop guitar plates. Unfortunately I found very little in the way of reviews online for this machine. Unlike the 6040, there seemed to be a rather small (tiny?) user community, however there was an actual company and support organization behind it. It also didn’t include any software beyond the UCCNC control software used to convert the G-code into machine-specific commands. In the end, I was convinced by the online user videos of this machine in action and decided it offered the best trade-off between cost and support.
I ordered the machine on Black Friday and it arrived 3 weeks later in a large 50 lbs. box.
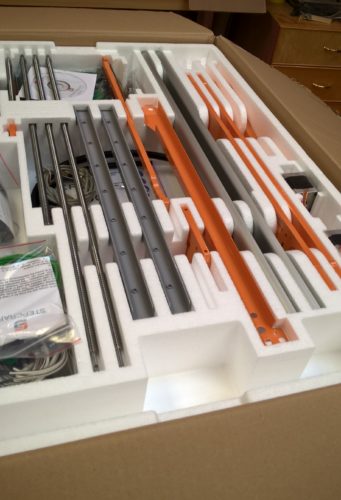
Opening the box
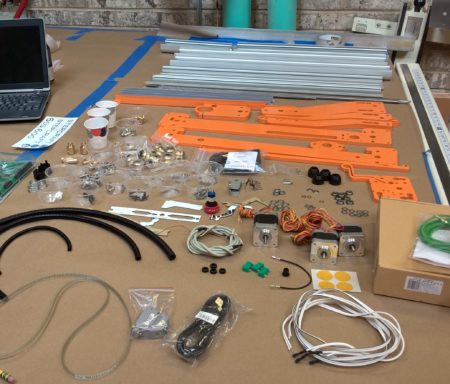
Parts arranged on the table, ready for assembly

X-Z-connector sub-assembly completed
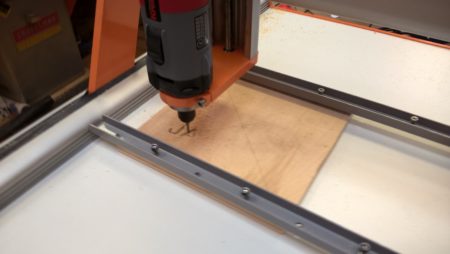
First test cuts!
Assembling the machine
Like the X-Carve (and unlike most of the others I reviewed), the Stepcraft 2 comes in kit form (unless you pay them an extra $500 for assembly). I chose to build it myself saving the money and more valuably, gaining an insight into how this machine works and what can be adjusted.
The assembly instructions are colorful and consist almost entirely of illustrations. Many of the key assembly bits are punctuated with QR codes pointing to online videos giving further details on the process. This made for a fairly easy, if not thoroughly enjoyable, assembly process. There were a few gotchas along the way though…
First, the “X-Z-connector” assembly black plastic “cable collector” parts kept falling out of place. This is the very first bit you assemble and so it was a major hassle. More troubling was once the wiring was fed through the collector, the constant in-out of the piece wore away the insulation on the wiring. I augmented with black electrical tape, but the wiring is now weakened in this area. It shouldn’t be an issue as the wires are generally stable now that the machine assembly is complete, but it’s obviously not ideal.
The use of adhesive strips to secure and encase wiring means that if I ever need to access the wiring (say to replace worn insulation!), I will need to pry the strips back and reglue them or purchase replacements.
The X,Y, & Z lead screw adjustments. Here’s a case where, though I did read through the manual before starting, I didn’t catch the adjustment at the very end and so spent far too much time fussing over the earlier adjustments. The video suggests using calipers to set the lead screw at this early stage, implying it’s critical to get it precise. However, it’s quite difficult to make this measure when the gantry uprights are still loose. I wound up rigging up special clamping jigs so I could get this accurately set. In the end, you do a final adjustment with the machine nearly fully assembled. At this point it’s trivially easy to adjust. There’s no need to sweat the adjustment at the earlier stage – I wish they would have said to just eyeball it close as that would have certainly been good enough.
The black flexible tube wire chases make for a very neat appearance, but are a huge pain to feed the wiring through. I don’t really have an alternative suggestion, but perhaps a slightly larger diameter tube would have made this a bit less tedious.
The wiring block is too close to the chassis making it difficult to insert the wires. Again, not a huge issue, but at this late point in the build — when you can almost smell the sawdust it’s gonna make — it’s annoying to have to spend so much time and energy trying to feed the wire ends into the block in such an unnecessarily tight space.
First cuts
I didn’t track my hours but I probably spent between 8 – 12 hours on the build over two days. The included UCCNC software was easy to install, though unfortunately I only skimmed the installation instructions and missed a key step resulting in some head scratching and concerns over the wiring. Once this was cleared up however, the machine checked out and was ready for a first cut. I clamped down a 1/2″ thick scrap of plywood, loaded the test “Stepcraft.nc” file into UCCNC, and homed the machine for the cut. Success!
Stepcraft test file
Software
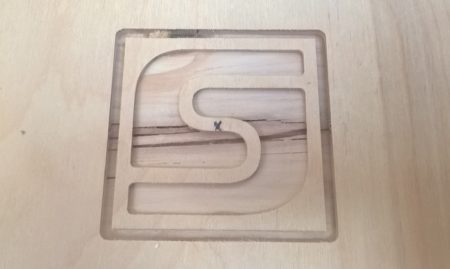
In order to generate my own G-code for this machine, I would need a CAD/CAM program. I tried several applications, including the amazing (and free!) Autodesk Fusion 360. But in the end opted to start buy purchasing Vectric Cut2D. It’s inexpensive ($149) and does 90% of what I need. Ultimately I hope to fill in the remaining 10% with Fusion 360 — once I learn how to use it, that is! In the meantime, Cut2D is very easy to learn and use. I exported a simple logo (mine) from CorelDraw and created tool paths in Cut2D. Once this was fed into UCCNC and I made my first real test cut:
Final thoughts
I’ve started playing around with this machine on some small projects with the kids, starting with edge-lit acrylic signs. The results have been impressive and I’ll write this project up separately. Suffice it to say I’m loving this machine! It’s especially adept at making multiple identical copies of small parts — something I’d never be able to safely and accurately do by hand.
The gantry is very solid and rigid. It moves smoothly and I’ve re-run/re-cut parts and found no noticeable deviation on the second or third pass. I milled four identical small boxes with rectangular inset doors. The accuracy was such that any of the doors fit in any orientation in any of the boxes. And the fit was tight enough to remain in place with friction alone, no latching required. I can see many uses for this capability, including things like milling perfect pickup rings and covers out of figured hardwood.
I’m fine with the UCCNC software. The interface is a bit cartoonish, better suited to a small machine-mounted touch screen than a desktop PC. I’m guessing that’s what it was originally designed for. Having no professional CNC experience I can’t say how it compares with other programs or professional machines. It was easy to learn and I’ve been able to do everything I need with it so far, so it is certainly at least adequate.
I’m not terribly fond of the included clamping system. The bolts are awkward to hand tighten and having to use hex wrench to secure material is tedious. The clamping rails also have a tendency to fall out of the slots during clamping. One of the first improvements I plan to make is constructing a replacement bed of MDF with t-slots for clamping.
Another issue I’m having with the machine that I haven’t yet investigated on the forums or with support, is the “soft limits” in UCCNC. They seem to artificially restrict the work area. Furthermore, I’ve noticed that if I jog the gantry to the extreme end, triggering the Y-axis limit switch, UCCNC will continue to increment the position in the software for some time after the gantry has stopped moving. This has the effect of moving the Y-axis 0 position away from the end of the machine, effectively losing some of the bed capacity. For the time being I’ve found that disabling software limits works around this condition effectively. The hardware limit switches are still there to protect the machine. I’m hoping this is something that can be easily remedied but at this point it’s more an annoyance and not something that’s preventing me from working with the machine.
Overall I feel very good about this purchase and plan to start cutting templates and guitars on this machine in the next week or so. I haven’t used it long enough to recommend this machine yet, but will update this post with my experience and opinions after some time has passed and I’ve had a chance to use it on more projects.
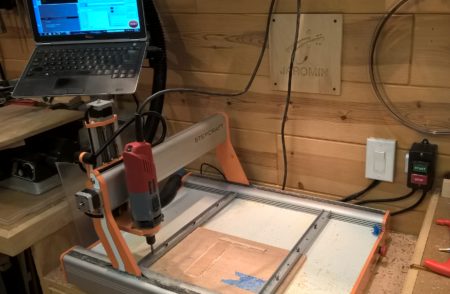
Stepcraft 2/600 in its new home!
UPDATE #1: After several weeks I find I’m liking this machine – and CAD/CAM more and more. I’ve sorted out my “soft limits” issue (safe-Z setting in Cut2D) and have started learning Fusion 360 which I intend to use for more complex projects. I’ve made a new base surface of MDF and will be installing threaded inserts as soon as they arrive. I’ll also be upgrading the screenset of UCCNC with the one from the CNC Woodworker which should remove my UI concerns with UCCNC. I’ll be building a z-axis touch plate and installing a laser pointer to help positioning soon. Definitely happy with this purchase so far!