

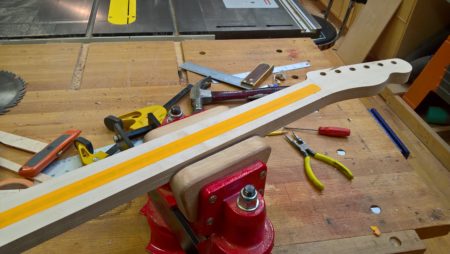
Preparing to glue on the fretboard

Fingerboard inlay design
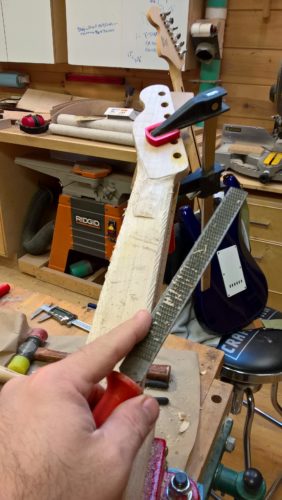
Carving the neck
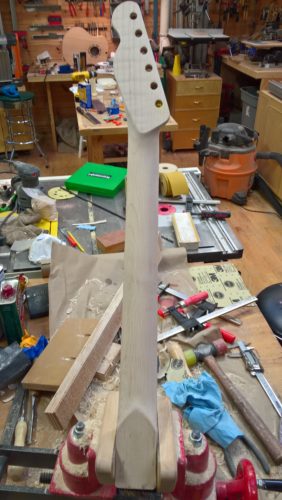
Nearly completed neck profile

Closeup of the back of the headstock after carving
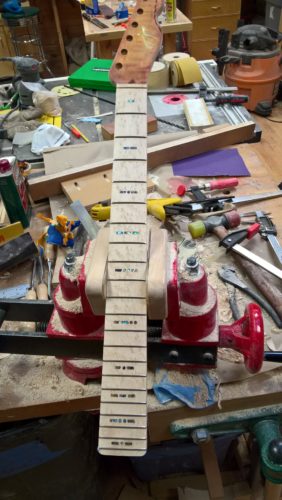
The completed fretboard
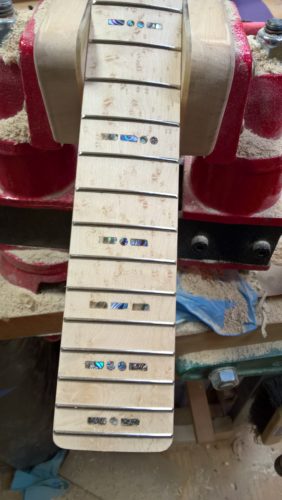
Closeup of the binary inlays
For this guitar I wanted to do something a bit different for the fret markers. Though I considered a somewhat elaborate inlay like the previous two, for this one I was thinking of something a bit simpler and unique. As I’m in software engineering I’d been toying with the idea of essentially labeling the fret markers with their binary equivalents. For example, in binary the number 3 would be represented as ‘0011’, the number 5 is ‘0101’. I didn’t want anything quite that blatant — in fact the goal was to do it in a way that you’d never realize it was binary unless you were told.
After a couple hours sketching on the computer and playing with several ideas, I had a basic design. I used circles for 0 and rectangular shapes for the 1’s. To keep this looking good I would use only the left-most 4 bits (a nibble) and trim leading 0’s. For fret markers above 12, I decided for aesthetic reasons to recycle and use 5 for 15, 7 for 17, though upon further reflection perhaps it would have been more appropriate to start with ‘3’ again since this is a new octave? Either way I think it works very well.
This was the first time I used the CNC to cut shell, and it turned out to be easy, fast, and of course accurate. I purchased some cheap Chinese Ti-coated 3/64″ “rotary burrs” which looked like they’d do the job. I first tried holding the small 3/4″ square pieces of shell down to a scrap of MDF with CA glue and a slip of white paper between the shell and the MDF. The cut went great but removing the cut pieces turned out to be problematic – a couple of the pieces broke as I attempted to pry them off. Next I tried 2 layers of blue masking tape laid on top of the MDF and CA glued the shell to the tape. This worked perfectly. It held solidly in the machine and when done I was able to peel back the tape and remove the shell. I gave the pieces an acetone bath which freed them from any remaining tape. This will save tons of time and frankly make it possible for me to cut these very small shapes that I otherwise haven’t been able to do by hand.
The rest of the process went smoothly — sanding the 9.5″ radius, installing and filing the frets, etc. Once again I carved the neck, starting with a course file and progressing gradually down to finer files, card scrapers, and ultimately sand paper. The neck measures about 19.36mm thick at the 12th fret and is about as consistent as I can make it by hand, varying well under 1mm. This is nearly 1mm thinner than the example Fender Squier strat I was using for reference — though ultimately my reference is feel. As it gets down to the approximate final shape and size I tend to stop frequently and test fret positions for feel until I’m satisfied that it will play comfortably.
At some point I’m expecting to cut some profile templates to use for reference instead. These would be primarily for shaping necks to client specifications rather than to my own personal preference. But for now, this ‘by feel’ method has produced happy results based on feedback from other players, so I’m sticking to it for the time being.
I managed to complete 20 coats of hand-wiped poly clear coat on the body while finishing up the neck. Next up is sanding and polishing it up before final assembly and setup.
This one’s nearly in the books and ready for its first gig!