

- It’s a Duesy, Two

Two bodies: Ash and Maple Burl (Double Dragon) and solid Mahogany

Filling the bridge ferrule holes before redrilling

Fine-tuning the tenon to get a perfect fit
Test-fitting the neck tenon

A perfect fit

Looking good from the back as well

Very happy with this joint
Gluing in the neck

Final sanding and prep before applying stain finish

Front aft applying first coat of Tru-Oil
First coat of Tru-Oil applied

Leveling and dressing the frets
When starting the build for the Double Dragon I had already decided to build a second. One for the raffle and one for me. At the time I wasn’t certain which would be which.
I was down to one Maple burl cap on hand, so one of them would have to feature a “plain” top. I had plenty of beautiful Mahogany in stock, and thought it would be interesting to build the second one in all mahogany. For the cap, I would resaw a thin slice from the body, hollow out the chambers, cut the sound hole, and then rejoin the pieces.
After much consideration, I chose to donate the figured Maple burl-capped guitar and keep the Mahogany one. The Mahogany body was set aside and work beagn on the “Double Dragon.” With the charity event now over, it was time to turn my attention back to the all-Mahogany Double Cat. This one would be for me.
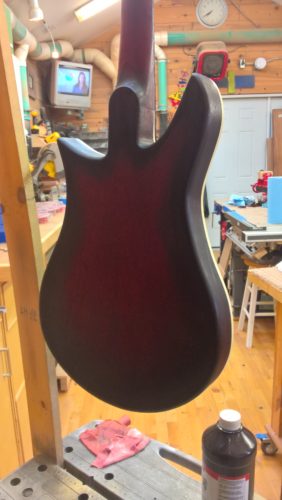
I knew right off that this one would be a deep red-to-black burst finish. I would also use this opportunity to work on my Tru-Oil finishing technique. The Dragon was my first attempt at Tru-Oil, and for a time I thought maybe my last. This time I’d try again and follow a different set of directions.
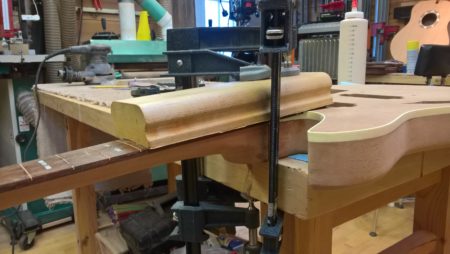
First a neck blank with stacked heel was cut and glued up from Mahogany. I let the CNC cut out the fingerboard, including inlays. I used a tiny .023″ end mill to mark out for the fret slots. They were cut to final depth by hand to save time and wear on the delicate bit. A relatively flat 12″ radius was sanded into the fret board before mounting it to the neck.
The Double Dragon featured a 3-degree neck angle. Though this seemed like the perfect angle on paper, in reality the bridge barely fit. I managed to get the action dialed in, but couldn’t use the roller bridge I had originally envisioned since it would have raised the strings uncomfortably high. For this guitar I would adjust the angle up to 4 degrees. This would mean recutting the neck pocket top angle, already cut to 3 degrees. I don’t have a router bit of an appropriate length to reach the bottom of the neck pocket, so rather than recut the bottom, a 1-degree shim was inserted.
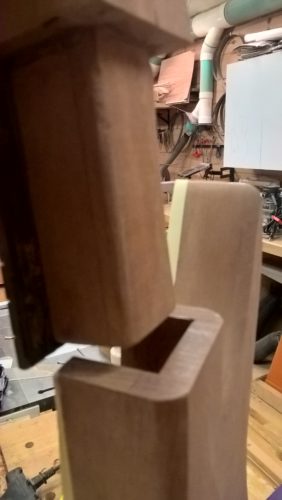
With the pocket angle finalized, it was time to cut the tenon in the neck blank. Looking back on the dragon, another issue here was with the back side of the tenon shoulder. I’d used the table saw and sled to cut the shoulder on the sides and back. This also meant angling the blade 3 degrees for the cut along the back. Unfortunately the cut was a hair off of perfect, so there was around 1/32″ gap to one side of the joint in the back. This required filling to obscure. This time I wanted the joint to be perfect, and so I decided to cut the back carefully by hand.
As seen in the photos, this worked brilliantly. The neck joint came out nice and tight, needing only a few passes with 80 grit to perfect the fit. After the neck had cured, I filled the grain with “Wunderfil” and stained it using Transtint dyes. First a deep red (bright red + black), then black shading around the sides and edges.
Tru-Oil take II
This time I would follow a different plan for the top coat of Tru-Oil. Following the “experts” on YouTube, I applied the first coat thick — basically flooding the surface and rubbing it in. When it started tacking up, I wiped all of the excess off with a new rag. A subsequent 4 or 5 more coats were applied in similar fashion, though much less oil was used for these. The result was a smooth, satin top coat that required only a buff and polish to complete.
The pore filler didn’t quite work to fill all of the grain. I didn’t mind the outcome, but I’m thinking that the power sander I used to remove the fill from the surface also pulled some out of the grain. Either that, or it simply shrank after curing. Either way, this is the next challenge I need to address. With the Maple-capped guitars this isn’t an issue, but getting a smooth, glassy finish on Mahogany will require some additional work.
Next up…finishing it up and trying it out!