Rose Inlaid Toddler Step

Just after our second child, Sean, was born, my parents came out for a visit. While they were here, my mother mentioned that she was planning to purchase a toddler step for my niece, Samantha. Apparently this has become something of a tradition for her. I promptly nixed that idea, insisting that I build one for her instead. 18mos. later, during another visit with my folks, I was reminded that the bench was yet to be delivered. Sigh.

The past two weekends I managed to scrape together enough hours to complete this simple bench/step. As my niece’s middle name is “Rose”, the plan was to inlay a rose into the top. I’ve done very few hand cut* dovetails, so I figured I’d also take this opportunity to gain some practice. And while I’ve incorporated inlays into a number of my previous pieces, I always welcome the chance to gain some additional experience there as well. So a rather simple, blocky design was born. While it won’t likely win any design contests, I found cutting and fine tuning the dovetails very relaxing. It was also quite satisfying to assemble.
The sides are walnut, the top, is cherry. The inlaid rose petals are bloodwood and the stem is zebrawood. The finish is Watco Danish Oil, natural.

(*full disclosure: by “hand cut” I mean using a bandsaw and chisels instead of a router template. If it’s good enough for David Marks…)

IMG_5912

UPDATE:

I decided it needed a couple top coats of a tung oil-based finish. This added a medium sheen to the piece and I think improved the look dramatically. I’ve replaced a couple of the older pics with the new ones below:

IMG_5922

IMG_5927

This project on my lumberjocks.com page:
Click for details: Rose Inlaid Toddler Step

Facebook Comments
Categories: Woodworking | Tags: , , , , , | Leave a comment

Simply Done

I had higher hopes for the finished room — some custom cabinetry and perhaps some painted details — but in the end, I settled for “neat, organized and finished.” On a friend’s suggestion I hacked off the lower two cabinets from an old built-in desk unit that was in the basement (and before that in the previous homeowner’s kitchen) and mounted it at counter height along the back wall to act as a planting station for my wife. I bought a Rubbermaid hanging organizer system for the side walls, which worked out fairly well. Overall, it’s nothing terribly special, but it’s functional, organized and clean. Here’s a before/after picture set:

Before

IMG_5352

After:

IMG_5684
I’m nearly done with the initial design phase of the basement remodel and hope to begin blogging about that in the very near future.

Facebook Comments
Categories: Remodeling | Tags: , | Leave a comment

A Fresh Coat of Many Colors (of Paint)

This past weekend, Mother’s Day weekend, I gave my wife what every mother wants: a silver “mother and family” necklace and a freshly-painted garage!

Mixology

Originally I was planning on heading out to HD and buying a gallon or so of “oops” paint (ya know, the stuff that they mix by mistake and sell dirt cheap) for the walls. But then, a woodworker/remodeller friend of mine suggested a better approach. He keeps a 5 gallon bucket that he uses for all of his left over paint. When he has paint that he no longer needs, he just dumps it in the bucket and uses the mixture to paint non-critical areas — like his garage walls. What a great idea! It also just so happens that I had a dozen or so paint cans of mainly light, neutral-color paint left over from the previous homeowner. Since all of the rooms that used this paint have since been repainted, there was certainly no problem with disposing of the stuff in this manner. I also had just emptied my 5 gallon bucket of “ceiling white” repainting the garage ceiling. So, off goes the bucket cover and in goes the hodge-podge of leftover latex — numerous brands, sheens and colors. The end result — the perfect shade of beige/tan. It was honestly about as close to the color I had in mine as I could have gotten. What luck.

IMG_5474

Floored, Redux!

The floors were next. We purchased the house nearly 5 years ago. The original homeowners had taken very good care of the place, including painting the garage floor a lovely shade of battleship grey. Unfortunately, by the time we got it, it had seen better days. About 4 years ago I rented a floor sander, stripped it down and applied a coat of Rust-Oleum’s Garage Epoxy. This looked nice, but I chose a bad time for doing the job. The epoxy pot times vary based on air temp…and the outdoor temperature that day soared to over 80 degrees. This resulted in a rather short pot time — which I exceeded. I found myself running low on usable paint by the end of the second bay. This resulted in pretty poor adhesion in spots.

To prepare for the fresh coat, rather than take the time and money to rent another sander, I decided to use my belt sander on my hands and knees and some 60 grit belts. This worked pretty well (and didn’t hurt nearly as much as I had feared!) And this time, I paid a bit more attention to the kit directions. The weather on Saturday was perfect – it stayed in the 60’s all afternoon. This meant a total 2-hour pot time…plenty of time to finish the job. Some of the spots where the previous coat was removed more completely soaked up the new layer a bit more, resulting in some lower-sheen areas. However, overall I think it looks terrific.

IMG_5502

Dressin’ Up the Joint

Finally, I installed a motion-sensitive light switch for convenience, an Insteon-enabled switch for the outdoor lights added to my dusk/dawn timer routine, and replaced the wall plates and the old, dusty GFCI outlet with a new model. I dressed up the window by installing some inexpensive faux-wood blinds.

IMG_5525

IMG_5527

Hiatus…

Next up, I’ll be moving the refrigerator down off the shop steps and back onto the floor…and then putting this project on hold for a bit so I can move on to the basement remodel. We’ll be turning our basement into a kid’s playroom with a Broadway/”Peter Pan” theme, which I’ll naturally blog about here.

After that’s done I expect to turn back to the garage and put up some cabinets and work surfaces.

Facebook Comments
Categories: Remodeling | Tags: , , | Leave a comment

Garage Remodel

Now that the shop is pretty much complete and the weather’s turned a bit more spring-like, I’ve decided to tackle the garage. Since I no longer need it for woodworking, save the odd large-piece assembly, we’re going to revert the space back to a more traditional use: car, bike and outdoor-kid-toy-storage. In addition, we’ll be adding a workspace and storage for gardening tools andn supplies. I also plan to repaint the floor…hopefully this time it’ll last a bit longer without the heavy tools and constant traffic from woodworking. Here are the before shots:

IMG_5277

IMG_5348

You can see the old lumber rack on the right-hand side. This is being replaced with something a bit more compact and likely moved to the other side.

This weekend I’ve managed to clean out the clutter and apply the first layer of joint compound to patch the myriad holes and nicks in the drywall.

As for my “scrap wood” pile: the DuPage Children’s Museum is a great place for kids — our 1 and 2-year-old really love it there — and they have a spot for wood donations. As I had piles of hardwood and 2×4 cut-offs that I really didn’t want to store in a corner somewhere during the remodel, I ran these over to their donation bin. Much better than tossing it out!
IMG_5352

Next up: painting the ceiling, walls and floor!

Facebook Comments
Categories: Remodeling | Tags: , , | Leave a comment

Shop Air, and Sheet Goods Get A Home

My original design for the shop included multiple compressed air outlets scattered about the shop. At the heart of this system would be a 60gal Ingersol-Rand 2-stage compressor providing at least 15 SCFM@tenonandspline.com90psi. Now months later, I’ve significantly revised and downgraded my plans. Part of it was financial, but most of it was a realization that all that I really needed was to be able to use my nail guns without the hassle of dragging out the compressor every time and tripping over hose.

Retractable Air Hose

To that end, I revised my plans and settled on a much simpler setup. I would put my existing 17gal Husky in the crawlspace below the shop, and run a hose through the floor next to my main assembly table. To this I would attach a combination regulator/filter/oiler and a retractable hose. This is precisely what I did.
IMG_5280

The air filter/oiler unit is a $20 special from Harbor Freight…well, I got it for $20. It was down to $15 last time I checked…sigh. Unfortunately it only occurred to me after I had purchased the filter unit that I don’t really want an oiler. While most of the time I’ll be using a nail gun, I do occasionally wish to use the air hose to blow off the shavings from a piece in progress and I doubt that misting it with tool oil would be very good for the finish. I’ve mounted the unit anyway and plan to keep the oiler empty. Perhaps someday I’ll move this device to another location on a separate hose and reserve it specifically for tool use. Or maybe not.

The hose reel was $30 for 20ft. It was the cheapest I’ve seen and while not as “industrial” as some of the more expensive units, I kinda preferred the compact size and appearance of this one. It also included a swivel mount. It works great right now…hopefully the mechanism will prove more reliable than the price would imply. We’ll see.

Automatic Drain Valve

Another Harbor Freight special. The plan was to locate the compressor in the crawl space, accessed via a trap door in the floor. Draining it regularly via the drain cock would be somewhat of a hassle. What I needed was an automatic drain. Thankfully I found this site in about 5 minutes of research pointing to a product from Harbor Freight. It was fairly straightforward to install — except that the inner diameter of the hose running from the unloader valve to the pressure switch on my compressor was too small for the included fittings. I ultimately wound up buying a different fitting which suffered from the same issue — but was setup in a such a way that I was able to coax the hose over the inner brass piece by applying a bit of heat. A bit of sanding of the outer tube was also required to get the connector attached to the tee. It was a bit of a chore, but ultimately I managed to get it all to work. And just like the author of the site above, my new drain cock valve was no good…so I also replaced it with a part from HD. The thing about the drain is that it only opens when the compressor starts and shuts off. So I can either leave the compressor on so that it “tops off” periodically (thereby activating the drain) or program the switch it’s on (see my other posts re: Insteon) to run it for a few minutes each day and give it a chance to drain any condensation.

IMG_5303

Vertical Sheet-goods Pen

Finally, after filling the compressor, I used my new hose and old air nailers to build a 9′ tall x 30″ wide x 36″ deep vertical sheet goods pen just outside the shop door and install some cheap pre-primed moulding around the pen face and shop doors.

This is the start of my next big project: the Garage Remodel.

IMG_5278

Facebook Comments
Categories: Workshop Addition | Tags: , , , | Leave a comment

An Hour Here, a Half-Hour There and a Few Saturday Mornings

Over the past month I found very little contiguous time to make progress on the shop setup. Consequently I never felt like I had made significant enough progress in any given week to warrant a new post. While I’m still quite some distance from the finish line, I finally feel like I can actually say, once again, “I have a shop!”

IMG_5248

Dust Collection Controls

I installed a half-dozen doorbell buttons around the shop, under bench tops near power tools, on the wall by the bandsaw and underneath the tablesaw fence next to the power switch. I installed a couple power outlets in the crawl space under the shop for the controller as well as my air compressor which I located in a corner of the crawl. I also programmed the air filter as I discussed in my last post to automatically switch on with the dust collector and off 2 minutes after the collector is switched off. I’m extremely pleased with how this has worked out.

IMG_5192

Supplies Organized & Remaining Tools Installed

I finally managed to commit to drawer assignments for my tools and supplies. For the most part the drawers are logically organized, though a few of them are temporary “catch-alls” waiting for the day when I complete the upper cabinets. I enlisted the aid of my brother, sister-in-law and nephew to help wheel the 17″ Grizzly bandsaw up a ramp and into the shop. This turned out to be not as difficult as I’d feared it would be. I also unboxed the Ridgid oscillating sander I’d purchased nearly 3 months ago and connected both to the dust collection drops installed previously. All the tools are in!

IMG_5264
Clamp Racks

Following some quick research at my favorite site, I assembled and mounted some clamp racks for my rather modest pipe, parallel and bar clamp collection. I still have a number of spring and “C” clamps to hang, but I’m satisfied with the arrangement for now.

IMG_5265

A Number of Tasks Remain

No matter how much I manage to accomplish, the list never really seems to get any shorter. Some tasks that remain are setting up dust collection for my router table and building an overarm blade guard for the table saw. The router table will require installing some kind of enclosure around the hanging router…which will take some time to devise. I’m also working on a design for a tall thin “drawer” to fill the 2 spaces in the RAS cabinet. These opening are roughly 36″ tall by only 9″ wide. I’m thinking that I’ll create a sliding angled vertical panels in one to hold router bits and a vertical pull-out panel in the other for miter/RAS/table/circular saw blade storage. Next steps also include major improvements to the “large piece assembly area” — which my wife insists upon calling a “garage.” Improvements include an updated lumber rack and sheet goods pen as well as some custom cabinets for “non-wood-related” storage…though I can’t imagine what that might be.

IMG_5258

The bottom line is that I’m just about ready to get back to spending at least some time working “in” the shop instead of “on” the shop! Hooray!

Facebook Comments
Categories: Workshop Addition | Tags: , , | Leave a comment

Hacking the Delta 50-875

(This post is based on a LumberJocks.com forum thread.)

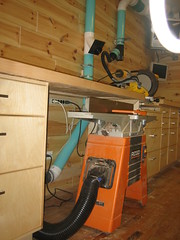
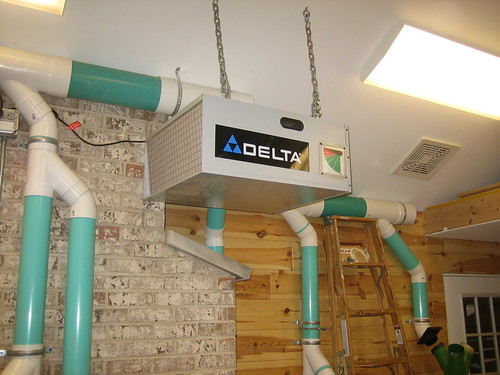
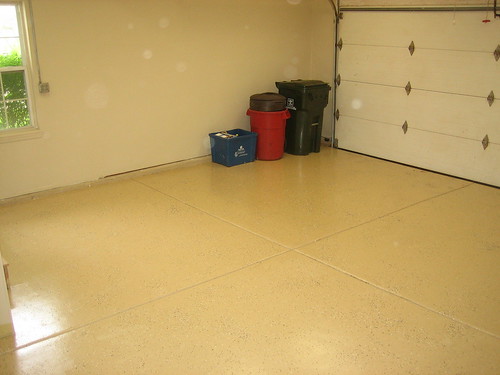
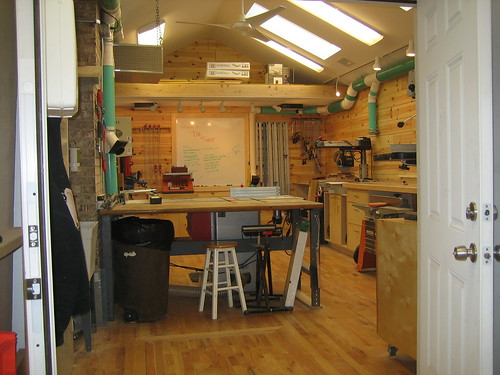
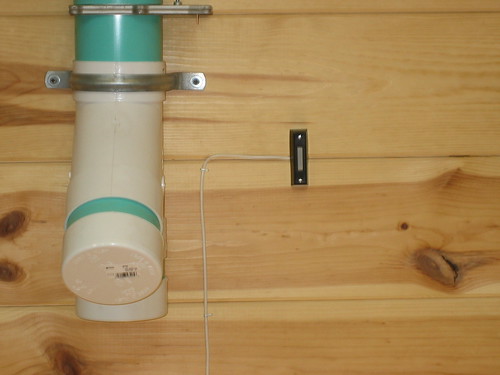
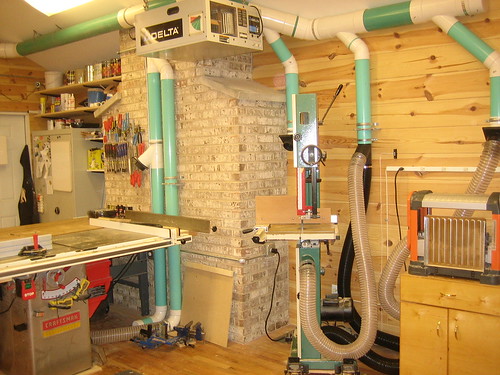
After completing my dust collection system installation, I turned to my air cleaner, the Delta 50-875. I had decided to install it just above my table saw — about 2/3rd’s of the way along the wall, where the intake would be in line with the front door and the outfeed inline with the ceiling mounted vent fan. After reading “Woodshop Dust Control” this seemed like the ideal placement and this location had the added benefit of not obscuring any usable wall space — which is at a premium in my small shop.

IMG_5146

An Awkward Arrangement

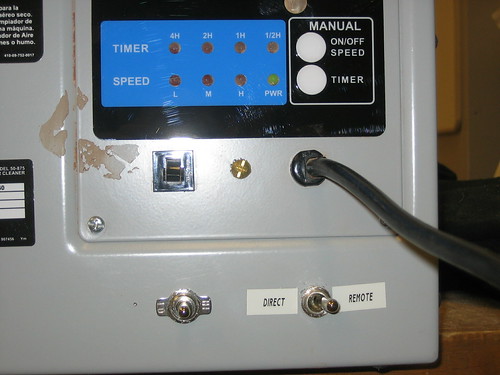
One of the selling points of this unit is the built-in infrared remote control that allows you to install it out of reach and control it from below. The problem is that the remote sensor is in the back of the unit. While the unit location is ideal for air flow, it’s rather awkward for IR control as I’d need to walk around to the back of the unit, and to a “far” corner of the shop, to turn it on/off. I’ve always thought that what I really wanted to do was to control it with a switched outlet. The problem with that scenario is that the control panel built into the unit is solid state and doesn’t “remember” the settings when you unplug the unit. That is, if you turn it on and then switch off the outlet it’s plugged into, when you switch the outlet back on, the air cleaner will remain “off” until you again manually press the “on” key on the unit or the remote control.

So, there was no way to make this happen…or was there? I reasoned that since it’s just an electric motor and a control panel, certainly there would be a way to re-wire the unit, bypassing the built-in solid-state controls so that I could hook to a switched outlet.

IMG_5134

Exploration

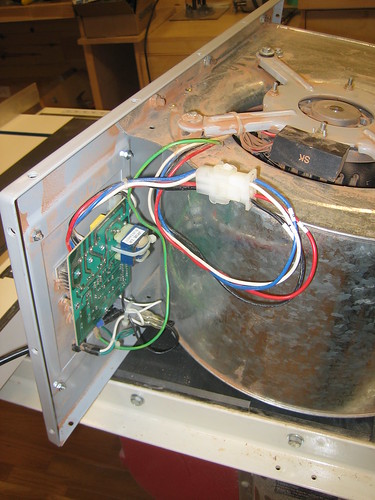
The air cleaner itself is pretty basic. It’s a rectangular metal box with a blower motor/fan in a housing, and a control panel. The motor and control panel are both mounted on the back panel which is simply screwed into the metal box. Once the backpanel assembly, including the blower was removed, I began the process of working out exactly what needed to be done to re-wire the motor. Fortunately, the motor wiring connects to wires from the controller through a nylon connector that, once unplugged provided an easy means of measuring various voltages and resistance. As I knew nothing about wiring AC motors, I began the process with a google search…many of them. Unfortunately, none provided me with anything that I could really use to definitively determine how this motor worked. In fact, I was left with more questions than I’d had originally…who knew there were so many types of AC motors! Initially, as there were 3 colored wires (Red, Blue and Black) and one White (clearly “common”), I assumed there were 3 windings and each color represented one of the 3 speeds that the unit boasts. Based on what I’d read, however, I was now concerned that the large-ish capacitor on the red wire indicated that I might have a “capacitor start” motor which would require something more complicated than simply applying voltage to one of the wires. Perhaps an electrical engineer, at this point, would have provided me a definitive way to check this out…but there weren’t any in my shop, so I tried a different tack.

I reasoned that the best way to reverse engineer this setup was to hook up each of the colored wires in turn to my volt meter — using white for common — and turn the unit on, cycle through the various speed settings and note the voltages. This did the trick. Here are the measured results:

wire slow medium fast
RED 121V 9V 9V
BLUE 9V 121V 9V
BLACK 14V 14V 121V

Clearly this was going to be as straight-forward as I had first hoped! Red = slow, blue = medium and black = fast. That’s all there was to it!

Let the hacking begin…

IMG_5136

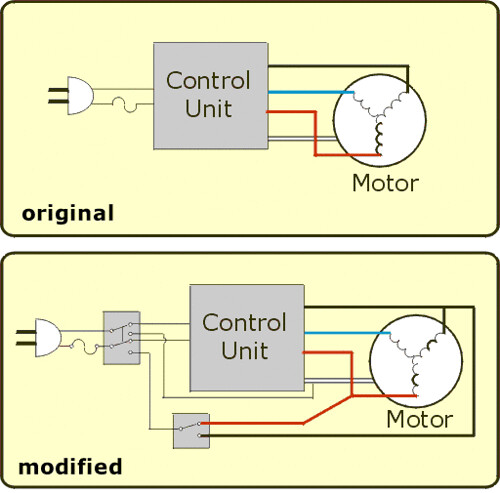
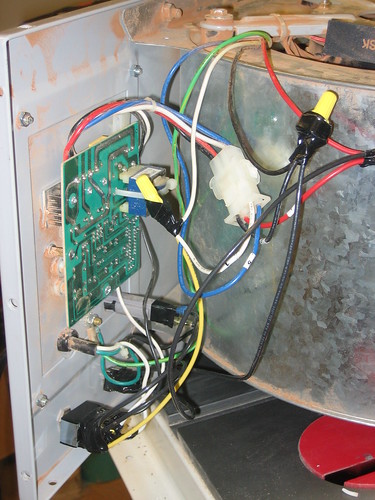
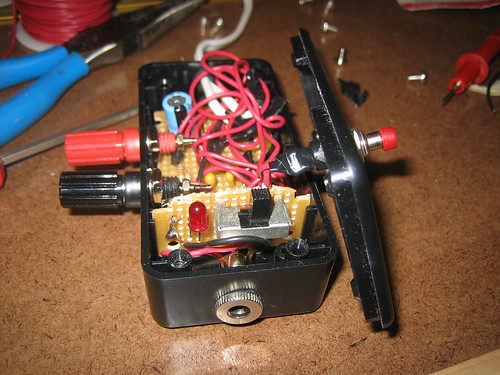
Now I was ready to start. In thinking through exactly how I wanted to wire this up, I realized that I might want to have the ability to change the speed at some point without opening the unit up. I also figured it would be pretty simple to install a switch that would basically allow me to “undo” this hack and use the unit as nature, and the Chinese factory had intended without having to un-hang and re-open the unit. The solution was a couple toggle switches. Since there’s an Ace hardware store right up the street from my office, I decided to stop by at lunch and see what they had. I was looking for a SP3T rotary switch that would allow me to cycle through all three speeds — but the only one they had was rated at 4A max. The fuse mounted in the control panel is rated at 5A, so I figured this switch wouldn’t do. The next closest was a SPDT switch, center off — and two speeds seemed “close enough.” For the “hack bypass” switch, I got a DPDT. While it seemed like it should be sufficient to switch only the “hot” wire, since I was going to essentially be supplying power to the output of the controller when using the hack (see drawing), I was concerned that a closed common connection might allow a circuit to complete and result in “who knows what”(tm) happening. So, I decided the safest thing to do would be to simply switch both common and hot.

The plan

Here’s a basic drawing of what was done:

50-875 hack

Moving forward

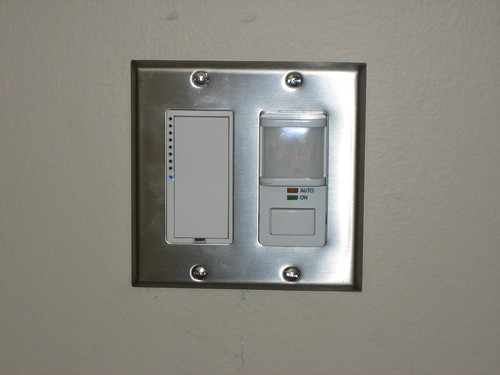
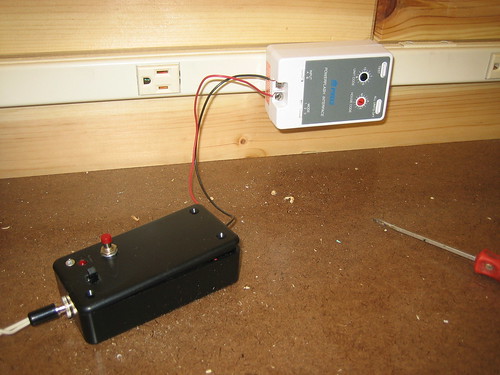
So the whole point of this modification was to allow me to control the unit by a switched outlet. The switched outlet is managed by an Insteon SwitchLinc which will allow for event-driven activation, such as turning on and off automatically with tools and/or the dust collection unit and wireless RF remote control via an X10 keychain remote. I’ll be refining the programming over the coming weeks/months.

IMG_5137

IMG_5139

Facebook Comments
Categories: Workshop Addition | Tags: , , , , | Leave a comment

Custom Collector Controller

If you read my last post you might recall how I decided to purchase an X10 “Powerflash Interface” to test out as a controller for my dust collector. My skepticism about how the unit worked turned out to be well-founded. The Powerflash device sends an X10 “on” signal when 6-18VDC is applied to the contacts — but once the voltage is removed, the unit immediately sends an “off” signal. What I was looking for was a way to use a single momentary switch to toggle the collector on and off…so that won’t do. In fact, the plan was to mount multiple doorbell-style pushbuttons around the shop and have it wired so that I didn’t have to turn the unit off at the same station where I turned it on. Since the Powerflash unit didn’t support this, I set out to basically build my own.

I’m not an electrical engineer and couldn’t design a circuit to do what I wanted, but I had no trouble finding a few options online. As a kid I used to quite literally spend hours loitering at my local Radio Shack store and would frequently spend what money I had on their “Engineer’s Notebooks” and specialty ICs to tinker with. So while I don’t fully understand the specifics of the circuits, it wasn’t much trouble reading the schematics or assembling the circuit. Of the three circuits I found online, my local Radio Shack store only stocked all of the required parts for one of them. This was, naturally, the most complicated one. It is succinctly if not aptly named Alternating ON-OFF Switch, #2.

A big box of parts…

After a couple after-work evenings, the “DustBunny 3000” was born…

Hooked up to the “Powerflash” for testing…

Labeled and plugged into the volt meter showing ~4.74vdc on the output

And here’s the video demonstration of the system in action:

Facebook Comments
Categories: Workshop Addition | Tags: , , , , , | 4 Comments

A Short But Productive Weekend

Countertops

IMG_5103I’ve been dying to start stowing my tools away in the newly built shop cabinets — getting them both organized and out of the garage where they’re making it difficult to keep the car. The last remaining obstacle is finishing the countertops. Not that I couldn’t finish them with the drawers full…but some time ago I noted that while the tops were individually level, they weren’t perfectly in the same plane with each other. If they’re not properly aligned, I’ll have a heck of a time using my compound miter saw accurately. Therefore, until I remedied the situation, the drawers needed to remain empty and easy to maneuver. This weekend was my chance.

T-Track

Once they were properly aligned I routed a 3/4″ wide x 1/2″ deep dado in the tops 16″ from the wall to accept a mini t-track. I had originally planned to use the blue stuff that Rockler sells — but I live much closer to a Woodcraft. Turns out that the only track Woodcraft carries that matches these dimensions is the siginficantly more expensive Incra stuff. Now, you’re probably thinking: Why didn’t he buy the track first and then route the dado to fit? The simple truth is I had neglected to order the stuff in advance (bad planning) and I didn’t want to stop working to head out to the store and the only track I had on hand was a length of the Rockler stuff. I also was actually planning to head to Rockler until google maps reminded me just how long a drive it was…2 hours round trip not counting shopping time would have put too big a dent into my limited time. IMG_5105 I ultimately decided to spend the extra bucks for the Incra track rather than wait for a delivery from Rockler. This turned out to be a good move. The Incra stuff is simply better…and for one single reason: the track leaves a space for the mounting screws. My regular mini-track can be a bit annoying to work with since the screws fit into a small countersink…and if you’re even a hair off alignment of the screw, the head will protrude from the surface and at the very least provide an occasional snag as you’re adjusting your stop block. Incra solves this by giving the screws their own space by milling little ledges on the sides above the screw heads for the guides to ride on. The screws can stand proud of the bottom without a snag. Simple but elegant and worth the extra $$.

Jointer Dust Port

One of the items I had left ’til now was hooking up the dust collection to my Ridgid 6″ jointer. The jointer lives under the countertop in the middle of the wall. I cut a hole in the back corner of the top and continued the run under the counter. I installed the blast gate at a convenient spot just above the counter.

CMS Dust Collection

IMG_5102Collection from my DeWalt 706 CMS was a bigger unknown. When setting up the PVC lines, I set a 4″ drop with blast gate just off center of the saw on the wall behind it. As I started to work out the details, I realized that I’d have to offset the pipe a bit more. The reason was that I wanted to have a hose hooked up to the built-in dust collection port installed in the “throat” of the saw…but I knew from past experience that this wouldn’t be sufficient, so I also was planning to build a venturi-box to collect from a wider area just behind the saw. The problem is that the hose sticking out of the back of the saw presses in pretty low at the back, making it impossible to run a pipe straight down from behind. Thankfully I didn’t use any glue in connecting the PVC, so moving the drop roughly 6″ to the right was fairly straightforward. At this point I’ve got the 1-1/2″ hose hooked up to the saw and a 4″ open pipe waiting to be hooked up to the yet-to-be-built venturi box. Next weekend, maybe?

Remote Control

IMG_5106This is still a work in progress — and if you’ve read this far and have had any experience at all, I very much welcome your suggestions/recommendations/comments. No where is this more true than with my emerging remote control setup. The dust collector is plugged into a 240V 20A Leviton X10-enabled outlet. I use Insteon for the majority of lighting controllers in my house and for the most part I love it. I decided to extend this into the shop. Unfortunately, at the time of this writing, there was no Insteon version of the 240v oulet. As Insteon is X-10 compatible, I decided to try it. I was unable to find much information/discussion online regarding using X-10 for dust collection, though I seem to recall reading a comment somewhere where someone indicated that it was less than reliable. This doesn’t surprise me as I’ve read quite a bit about the unreliability of X-10, and in fact have experienced it first hand in my setup where I’ve been forced to use it. Undeterred (or crazy), I decided to forge ahead anyway. Early on I had considered a blast-gate operated system like the Long Ranger or JDS system. It certain is an elegant solution, but the thing is I wasn’t sure I wanted to be forced to close all the gates in order to turn off the system…though there is clearly an advantage in that you’d know when a gate was inadvertantly left open. Anyway, I still wasn’t sold and have thought that what I’d really prefer is a bunch of discrete momentary switches placed strategically around the shop – a single switch that I could press once to turn on and then again on any of them to turn it off again. After some searching and a brief chat with a Smarthome employee, I decided to try an X10 Universal Module. It’s still not clear to me that “mode 3” will actually do what I want – I’m very skeptical – but the Smarthome guy said it would and for $26, I’m willing to give it a try. I also picked up an X-10 keychain remote. In the meantime, I’ve programmed one of the buttons on my main shop KeypadLinc to control collector and have also plugged in an extra X10 controller I happened to have gathering dust in a corner. I guess it’s still gathering dust, just in a very different way!

Facebook Comments
Categories: Workshop Addition | Tags: , , , , , , | Leave a comment

The Monster in My Closet

OK, so maybe not exactly a “monster,” but the old Woodtek 3HP double-bag dust collector I bought sure does sound like one…and appears to live up to its 2100CFM (free-air) rating.

Dust Collection Closet Door
Dust Collection Closet - The Beast Within

I’ve finally finished the main duct work runs and over the weekend I cut the hole from the shop into the external “dust collection closet” and ran the 6″ main through. As I had feared, the dust collector argued mightily against being confined in such cramped quarters. The closet is <30" deep and ~60" wide with a standard 36"x80" door. The two-bag collector simply wouldn't make the tight turn through the doorway. Fortunately I'd half suspected this would be the case and was already mentally prepared for the situation...which likely saved my neighbors an earful. The solution: disassembly.

I removed the upper-half, post-fan section that holds the bags to the blower and then removed the lower half, including the motor from the base. I’d already purchased a length of 6″ flexible hose that I’d planned to use to join the collector to the 6″ S&D piping…figuring that it would likely be a rather convoluted angle and possibly too tight a fit for a hard plastic 90-degree elbow. By mounting the base directly to the floor of the closet, I also gained an additional couple inches – making it now possible to use rigid fittings. Ultimately the hookup turned out to be “do-able” using rigid piping as well, eliminating the need for the rather pricey 6″ flexible hose. Anybody need any 6″ hose.

Though I don’t have any tools for measuring CFM or static pressure, my quick test sweeping some sawdust piles into the floor sweep at the very furthest end of the longest/narrowest run and hearing the swooooosh as the debris found its way swiftly into the waiting collection bags was enough to convince me that the system should do just fine. I’m hoping to do a test using the planer tonight — if it can keep up with the 13″ planer, it should have no trouble with the other tools.

My one real disappointment is with the on/off mechanism. I outfitted the 240v 20A circuit with an X10-controllable outlet and programmed the “D” button (for “Dust collection” of course) to send the appropriate on/off commands. It worked the first couple times I tried it, turning the collector on and off as expected. However, the third time I tried using the second keypad (linked to the first) and this time…nothing. I went back to the first and tried it a few more times. Again, nothing. I recall reading some forum posts (don’t recall where) by some unhappy woodworkers/X10 enthusiasts complaining about the poor reliability of X10 — specifically in the context of dust collection systems. I was planning on purchasing a “Long Ranger” or similar system and using a combination of manual switches and blast-gate mounted microswitches in the future…apparently this will need to happen a bit sooner than I’d anticipated.

As usual, the entire installation process — well, the indoor portions at least — was covered by my trusty D-Link wireless cameras. Here’s the finished video:

UPDATE: Last night I completed the “planer” test as planned. I hooked up my Rigid 13” planer to a port at the end of the run and took some fairly decent passes on a 9” piece of poplar. The dust shroud was empty. I opened a couple other blast gates and repeated the test. Still clear. Looks like this “monster” will do the job!

Facebook Comments
Categories: Workshop Addition | Tags: , , , | Leave a comment