My “Green” Dust Collection System

Not “green” in the environmental sense, mind you…but green in a very literal sense. I’ve spent literally months planning out most of the details of my new shop, since before they broke ground. One of the features I was most anxious to include that I was unable to have in my shared garage space was an honest-to-goodness central dust collection system. One of the earliest decisions I needed to make: metal or plastic?

Metal of Plastic?

IMG_5055

I first read Sandor Nagyszalanczy’s oft recommended book “Woodshop Dust Control” where he makes a strong argument against the use of plastic PVC piping for ductwork citing the risk of explosions that could ruin your day/shop/life/etc. After reading this book it was clear to me that metal was the only way to go. That was, until I began researching actually purchasing the stuff. Expensive. What’s more, the stuff they sell at the “Big Box” stores is too thin…so the only real way to do this with metal ducting, beyond finding a local supplier (which I was unable to do) is to meticulously plot out the whole thing and place one big order to have shipped to the shop. While I’m no stranger to meticulous planning, I’ve never setup a dust collection system before and was not 100% sure I could plot this out perfectly without actually attempting to fit some pieces together first. In fact, I was pretty darn certain that I couldn’t plan this out to the last screw in advance of ordering the materials. I just knew I’d get half-way done with the install and either change my mind or realize I needed some other type of fitting(s) to finish the job. Without a local supplier, I’d be forced to place an order — likely a small one — and incur additional shipping charges and delays. Time’s too much of a premium to lose an entire day because I can’t get what I need. This realization sent me searching for alternatives.

IMG_5055

It didn’t take long for me to find some interesting forum discussions online…but the clincher for me was this extremely well-crafted article. The upshot of reading this article was that I was now certain that I would definitely use the cheaper/easier-to-find S&D PVC piping for my system. Fortunately or Un- I was now also paranoid about what I could appreciate was the most dangerous aspect of my dust collection system — a smoldering fire in a collection bag. (Mental note: daily emptying of the bags is a must. But I digress…)

A bit of searching locally initially indicated that my local “Big Box” stores carried only up to 4″ diameter piping. My basic math says that I’d really be better off using a minimum of 5″ ducting for the main run. As S&D pipes aren’t offered in 5″, I opted for the next size up…which, as I mentioned, I was unable to locate locally. That is, until an unrelated and rare trip to Menards where I discovered all the 6″ and 4″ fittings and pipe I would ever need. Excellent.

Goin’ Green

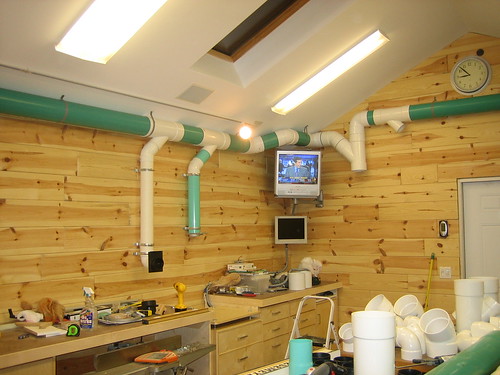
Menards stocks their PVC piping in an outdoor lumber yard. This meant that I placed an order off a sheet with a nice picture of white 6″ PVC pipe listed as ASTM 2729 S&D. When I got into the yard, however, the pipe was actually the green stuff..ASTM 3034/SDR35. The Menards product number on the sticker on the pipe and the label on the bin matched my receipt, so I’m not sure if there was a mistake in their inventory or their labeling…or if they for some reason sell the 3034 and 2729 interchangably (seems unlikely), but I didn’t see the 2729 anywhere so I figured I’d use the somewhat heavier, green 3034 that I had paid for rather than start the hunt over again. I purchased a few 10′ lengths of the 4″ thin white stuff from Lowes as well figuring I’d at least have white drops.

Fittings

I purchased my blast gates and quick disconnect fittings from my local Woodcraft store and started the assembly. What I discovered during the assembly was that the thicker-walled SDR35 was a significantly snugger fit for the pipe fittings. Also, while a special coupling is required to attach the blast gates to 2729, they fit perfectly in the green stuff. So, while the 2729 is a bit cheaper and much lighter, I save money overall with the SDR35 since there are no adapters needed to fit the blast gates to the pipes. Serendipity.

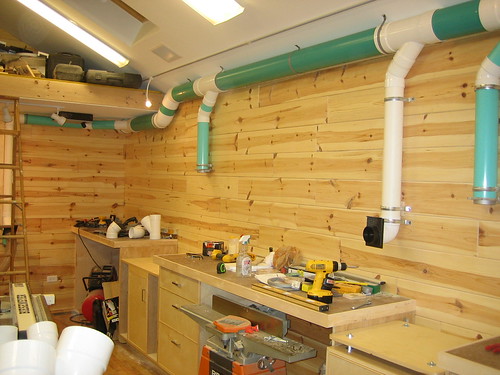
Assembly continues apace. I’m currently roughly 50% complete with the core installation, that is the main 6″ line is 80% complete and half the drops are essentially in. I still need to build the hoods for the RAS and CMS and work out the details of the fittings for the router table, which will likely take more time than the assembly time to date. I’ve still got the two cameras capturing the process and have been sure to move them as needed as there’s no one position that can capture even most of the shop. Editing of the time-lapse is ongoing and I will be posting the completed video when the job is done, natch.

Facebook Comments
Categories: Workshop Addition | Tags: , , | 1 Comment

Setting Up Shop II, or How I Spent My Winter Vacation

I’m not what you would call a “neat freak.” However, I do try to keep things generally organized and find it near impossible to work in a cluttered shop. Not only do I find it technically difficult to work in an unorganized mess – I find it hopelessly depressing as well. Consequently, when the shop is cluttered I will typically avoid doing any woodworking until the mess is resolved.Keeping the shop organized is especially difficult when the thing you’re working on is the shop itself. For the past couple months our garage and the new shop space has been a jumble of scraps of lumber and sheet goods, plastic bins of random hand tools, power tools, hardware, etc. somewhat haphazardly-arrange throughout. Need a hammer? Time to go routing through the bins. Double-stick tape? I just know it’s here somewhere. Not fun. Coupled with the scarcity of available “shop time” and basically nothing has been done since Thanksgiving.

To turn this untenable situation around I took a week-long vacation from my real job beginning January 7th. As luck would have it, this happened to coincide with a major “January thaw” with temperatures soaring into the 50’s and 60’s early in the week. After spending a day cleaning out the garage and setting up a temporary table to somewhat organize my tools/supplies, I set out to complete the job. First priority was the cabinetry. I had completed the carcasses and counter tops in November but hadn’t even planned the drawers. Drawers. After spending way too much time agonizing over their arrangement (do I make 3 or 4 drawers in this bay? One very deep or 2 shallower?) I settled on a design and slapped together some boxes out of 3/4″ ply and pocket screws. Not very “fine” I know, but I’d prefer to just get the shop done and get down to business on pieces bound for the house! Ply banded with 3/16″ maple bullnose serve as drawer fronts. After that I installed the ceiling-mounted speakers, running the wire through the 2″ PVC I ran before the walls were finished. I also ran RG-6 and Cat 5e cable to the 4 boxes placed around the shop, patching the works together, neatly, in the crawl space before hooking up a home run back to my communications panel in the main basement.

While I frequently use Google SketchUp to design my projects, I find that working things out on a whiteboard can be extremely helpful in the shop. I frequently use a whiteboard for my cut-list — writing large enough to be visible across the room. The one from the old shop is roughly 18″ x 36″. For the new shop, I wanted something a bit bigger, but “real” dry erase boards can be rather pricey. A quick google search turned up this page http://wiki.xtronics.com/index.php/Shower_Board_as_a_white_Board. For $10 plus some scrap pine I was able to build my own custom board for the shop. I installed a 4’x4′ sheet in the middle of the back wall and still have 1/2 sheet left for future uses. Lastly, I installed the TV on a wall-mount (for NYW and Woodworks, natch!) and moved the metal paint cabinet into place beside the slop sink.

As usual the process was covered by a couple web cams and I’ve edited together a brief time lapse…I only wish I could have completed the actual work in only 5 minutes.

Note: The angle of the cameras, properties of the lighting and advanced image compression may make it appear to the untrained observer that my hair is a bit thinner at the top. I assure you this is merely an optical illusion.

Facebook Comments
Categories: Workshop Addition | Tags: , | Leave a comment

Happy Thanksgiving!

Over the long holiday weekend I only managed to sneak in roughly a day and a half of work on the shop. Between Friday afternoon and Saturday I secured the base cabinets, assembled the “floating” top for the DeWalt 706 miter saw, and built the three countertops. Not too bad considering the time.

Facebook Comments
Categories: Remodeling, Woodworking, Workshop Addition | Tags: | Leave a comment

Two-maybe three-Degrees of Separation

cabinet-details.jpg

Over the years I’ve made many bone-headed mistakes.

Cut a piece too short because I “knew” the measure and didn’t feel the need to consult the drawings I spent hours preparing. Put a dado at the wrong height, the wrong length, or worse, the wrong side! Glue a part on backwards. I’m not quite old enough to say “I’ve made them all,” but by now I’ve definitely made my fair share of them. And while I tend to make fewer and fewer mistakes as time goes by…and thankfully don’t typically make the same mistake more than once (OK…maybe a couple times)…there’s usually at least something that requires special attention (repair, “design-around” or re-do) in just about every project.

This one’s unfortunately no exception.

Wixey Digital Angle Gauge

A few months back, while visiting my folks in Florida, I read a magazine review for something I just had to have. I was so concerned I’d forget about this miracle device that I immediately went online and surrendered $40. It’s called the Wixey Digital Angle Gauge. This is incredibly cool – due to both it’s utility and utter simplicity. Place it on the tool’s table, zero out the measure and then place it on the blade to verify/adjust the angle. Quick, easy, AWESOME! That is, when you actually use it.

This past Saturday I began my day in the shop (after helping my wife with the kids’ breakfast, of course) by cutting out the various parts for the new 22′ long cabinets/work bench/miter saw fence for the shop. After lunch, it was time for assembly. I had cut dadoes for the cabinet bottoms and tops and was looking forward to the satisfaction of dry-assembling the pieces and lightly “banging them home” with a mallet. Things were going swimmingly until I went to attach the top supports. The top was nearly 1″ wider than the bottom!

cabs1.jpg

How could this be???

After some choice words and a bit of grumbling I decided to have a closer look at my tools…and noticed the blade on the table saw read some 2-3 degrees off 90…which led to cabinet bottoms angling the walls a bit beyond their intended target. With the glue already curing and available time short, I decided to basically force the sides square and call it a bench. Truthfully, as mistakes go this one’s not too awful — there’s enough play in the dadoes to allow for the readjustment — but hopefully this will serve as a reminder to verify the dang blade angle before starting a new project; even when it looks 90 degrees.

Oh, and by the way…I also managed to assemble the right-most cabinet mirror-image to the design with the wider drawer compartment closest to the right-hand wall. No matter…I’ll just tell people I planned it that way. 😉

Facebook Comments
Categories: Workshop Addition | Tags: , , , , | Leave a comment

Setting Up Shop

img_4502.jpg

This weekend marked the beginning of the “load in” process. With Grandma and Grandpa in for the weekend, the kids were well occupied and I had the time to finally start to finish the shop addition.

On Friday evening I finished the loft underside — and did my typical lousy job of taping/plastering the seams. “Hat’s off” to the pros who do drywall for a living…someday I hope to get it right.

On Saturday, I needed to pay a visit to my local Woodcraft store in Woodridge. They were having a “tent sale” this weekend. I’ve been eying a cast iron router table extension for some time now. I was aware of two — one from Bench Dog and another from Peachtree Woodworking Supply. While the Peachtree version was significantly cheaper ($219 vs. $325), I was a bit hesitant about it as I was unable to actually see it and there were no online reviews available. From photos online it was clearly a different product from the Bench Dog version, though I’m guessing that they’re both imported from Chinese factories. In any event, Woodcraft had the Bench Dog ProMax listed as “no longer carried” on their website, so deep down I was hopeful that they might have a floor model or clearance package at the store that I might get at a good price.

After trolling the aisles for nearly an hour, picking up ~$30 worth of small accessories, I made a second swing past their closeout table and noticed something I hadn’t seen earlier — on the floor behind and underneath the closeout table — a Bench Dog ProMax wrapped in cellophane! Awesome. Apparently this was the floor model detached from a demo saw that was sold the previous day. After some brief discussion with the manager and then the “boss” (aka my wife Suzy), it was mine for $255!

The best part is how easy it was to install.

Not being a metal worker, nor having cut any metal denser than aluminum in many many years, I was concerned that I wouldn’t be able to properly drill holes in the cast iron top if needed. Turns out that a) I only needed to drill one hole through the front to attach the fence and b) it was not an issue. The holes in the table lined up perfectly with the saw top and it took almost no effort (even alone) to get the top flushed and tightened. Beautiful. While they say you don’t have to attach the front edge to the fence rail, I figured it couldn’t hurt. So I drilled a hole for the bolt – first 1/4″ starter, then a 5/16″ to finish size.

I then removed the wooden wing from the other side of the table and drilled 5 holes in the cast iron so that I could mount the old left wing in its place. I now have a full 60″ of cast iron top and no sagging melamine extension. I’m sure the extra weight won’t hurt either.

I then installed the track lighting and extension cord reels under the loft and got about as organized as possible to prepare for the construction of the cabinetry that will act as both storage and a shared miter saw/radial arm saw counter top and fence. Since I was getting no where visualizing the cabinetry required for these saws — even using SketchUp — I decided the only thing to do was to simply move them into the shop, test and fine tune their locations as best as possible, and take measurements from there. With some help from my neighbor Wilson (seriously) I was able to load in the jointer, miter and radial arm saw. I now have them positioned where (I think/hope) they’ll best be used and have begun the process of creating the detailed construction drawings for the cabinets/counter top.

Considering my available free time, I’m hopeful I’ll be ready to build/install drawers within two weeks!

Facebook Comments
Categories: Workshop Addition | Tags: , , , | Leave a comment

Lofty Ambitions…

OK, so the inspections went well — though it took 3 visits from the inspector. Mostly little stuff — but Jay promptly dealt with all of the issues and we finally made it.I’m now working on getting the shop “in shape” before moving all of the tools in. This includes building a 4′ x 14′ loft 7′ 6″ from the floor at the far end. I ran conduit and wiring for (2) ceiling mounted cord reels and a track light. I still need to tape and plaster the seams and screws before I can paint it and mount the extension cords and lights.

A couple weeks ago I picked up a used (circa ’89) WoodTek 2100CFM dust collector from a guy in Indiana for $200 (Craiglist is very cool). The first thing I did was replace the power cord — which is a good thing as the ground wire had apparently become disconnected.

Last weekend I extended some of the “old shop” (a.k.a – the garage) power into the addition. I ran (1) 20A 120v, (1) 240v 15A and (1) 240v 20A circuit into the room. The 240/15 is for the tablesaw and/or bandsaw. The 240v/20A is temporarily being used with the dust collector — I plan to keep it in the shop while I build the cabinetry and fixtures. After the cabinets are complete I will be running duct work so that I can move it to its permanent home in the street-facing “closet” in the front of the shop. I’ve also installed a smoke/CO detector in the shop as well…should make it a bit easier to sleep at night after a late night in the shop.

Today I’ve decided to build an overarm blade guard/dust collector for the table saw as well. So the next steps are – complete the loft “ceiling,” build the overarm collector, build the cabinetry and workbenches.

Considering my limited amount of “free” time, I suspect this will take me through the end of the year and a bit into 2008 before I move the rest of the stationary tools in. Then there’s the shelving/upper cabinets, drawers, etc to do before the small power and hand tools are organized. This could take a while!

Facebook Comments
Categories: Woodworking, Workshop Addition | Tags: , , , , | Leave a comment

Final Inspections Tomorrow…

Tomorrow is the final electrical/plumbing inspection. Provided everything passes, I plan to begin work on the interior on Sunday. (My wife’s birthday is Saturday so I’m taking the kids while she has a “spa day”.)

I’ve been reading “the Workbench Book” by Scott Landis and plan to read Ron Schleining’s “The Workbench” based on recommendations on Amazon and elsewhere, and my head is swimming with ideas for finishing the interior. At this point I have a pretty decent handle on the cabinetry for the long wall – opposite the fireplace – where the radial arm and DeWalt 706 miter saw will live and share a fence/stop system.

I build a lot of case goods and am frequently drilling shelf ping holes, routing dadoes for shelving, installing hardwood drawer glides, etc in substantial plywood panels. In the past I’ve used “back-to-back” straight-edge clamps to hold these on the workbench. I also enjoy cutting my own custom veneers. Therefore, I’m also thinking about building a rolling assembly table/veneer press that will live behind the table saw, underneath a flip-up outfeed table. I’m thinking the outfeed table will hinge on the fireplace wall (actually attached to the bricks) and flip upwards to reveal the assembly table which may also be wheeled around to make more room. In my head, this table is roughly 3′ x 6′ and features two full-width end vises, one on each 3′ end, along with a row of bench dog holes on both the front and back edge for clamping the wide stock.

I’ll post the plans for those once the drawings are complete.

In the meantime, I’ve finished the time lapse video of the exterior construction…from breaking ground through landscape repair. I may make some additional edits in the future…maybe make a 3-4 minute version (this one’s ~6mins. long). But at least for now…here it is:

Facebook Comments
Categories: Workshop Addition | Tags: , , | Leave a comment

If These Walls Could Talk…

I spent this past weekend installing Knotty Pine tongue and groove paneling in the new woodshop. As with the floors, I cut costs on materials by purchasing the “value line” stuff (offcuts, etc.) However, unlike the flooring, this stuff was awesome! When they said that most of the pieces were 3′ – 8′ long, they weren’t lying — in fact, there were far more 8′ pieces than I expected and though I tried to stagger my usage, I ended up running out of the smaller pieces before I was done. The 1′ – 4′ pieces were simply more convenient to handle when cutting out notches for doors, outlets, ceiling peaks, etc. This is good stuff and I highly recommend these guys.

The only real downside was that FedEx freight from Michigan cost nearly 50% of the cost of the lumber itself…however it was *still* comparable in price to buying the crap T&G paneling they sell at Menards or The Home Depot. In fact, I was a bit concerned that I would run out near the end and went to HD to buy a piece or two of theirs to use in an unseen area. Not only didn’t it match, it was just plain bad stuff…full of checks and dings and just not very attractive. I wound up buying a couple 8′ pine boards and milled a bevel top and bottom to match the look. I wound up with 2 8′ pieces left over after using 3 of the “mock” T&G boards.

Did I mention that I didn’t have to discard a single piece of of the paneling…or cut around any defects? Honestly…it was all good.

Here’s the time-lapse:

Facebook Comments
Categories: Workshop Addition | Tags: , , , | Leave a comment

I’m Floored!

It was a very busy Labor Day weekend. On Saturday I began the process of installing 300sq ft. of “utility grade” Oak hardwood flooring from Lumber Liquidators. This stuff is only $.89 sq. ft. — and for good reason. Much of it was under 10″ in length (many pieces significantly less). There were numerous pieces that were improperly milled, missing tongues, missing grooves, etc. I originally purchased 330 sq. ft of the stuff, but upon further reflection decided that I should have purchased less utility grade stuff – maybe closer to 250sq. ft. and maybe 100sq. ft. of good stuff (select Red Oak). I ultimately wound up buying around 60sq. ft. of select Red Oak so that I’d have at least a few long pieces to weave in periodically. Inserting the occasional 8′ long piece after working with tons of 6″ pieces also served as a morale boost – speeding up completion of that row significantly.

All things considered, I probably saved less than $200 in materials. However, I actually prefer the “patchwork” look for a workshop floor and it will definitely be easier to stomach the occasional inevitable incident that results in nicks, scratches and potentially gouges in the hardwood.

The next question is: How do I finish the floor? Do I apply Polyurethane? Water-based? Or should I leave it unfinished?

I’m fairly certain that at some point someone is bound to knock over a can of stain in the shop…and without *any* sealer, the wood will soak it up like a sponge. I’m also concerned about mud and water damage in the traffic areas. However, I’m also leery of a heavy – and occasionally slippery – polyurethane finish. For now I’m thinking of filling, sanding and then using a sanding sealer or possibly a light coat of water-based poly. Research continues.

There’s still a lot of work to do on the interior…but here’s a time-lapse of the weekend’s endeavors below:

The “kid” helping me in the video is “Mike” — he works for the GC who built the addition. My GC recommended him to me and my wife insisted I hire an assistant. My back thanks all three!

Facebook Comments
Categories: Workshop Addition | Tags: , , , | Leave a comment

New Time-lapse Uploaded


Warning: Undefined array key 3 in /home/u198444244/domains/tenonandspline.com/public_html/wp-content/plugins/wordpress-video-plugin/videos.php on line 2231

I’ve finished editing revision 6 of the time-lapse. Still some more to go, but this seemed like a good point to share.

Facebook Comments
Categories: Workshop Addition | Tags: , , | Leave a comment